A PRACTICAL GUIDE TO INTERPRETING RGB
HISTOGRAMS
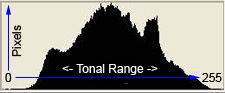
Learn how to interpret your digital camera's thumbnail image histogram to
help determine proper in camera exposure
Learn how to adjust tonal range in your scans or existing digital images
using the levels-histogram tool
PAGE 3
DIGITAL IMAGE TONAL RANGE ADJUSTMENT USING THE LEVELS TOOL |
||||
| The screen capture below is of the 'Levels' tool from Photoshop. This tool allows you to adjust the tonality of your digital image. It incorporates a histogram of the image. The levels tool has 3 adjustment sliders for white point, midtones and black point. Setting white or black point means assigning (re-mapping if you will) your very lightest and/or darkest current pixel values to pure white and pure black respectively. Or, as an alternative when appropriate, remapping the lightest and darkest existing pixels 'closer' to white or black. The Levels tool. also has color pickers (eyedropper tools) for setting pure white (alternate white point setting method), neutral grayscale and pure black (alternate black point setting method). You can select to view and adjust the RGB histogram (all three color channels at once) or each of the 3 color channels separately. The most commonly used adjustments are the 3 slider tabs just below the graph. There are also 6 informational boxes. There is a drop down box that allows you to choose the color channel/s to be used for the adjustment. You can choose RGB or R or G or B. The left side input levels dialog box lets you know the current numeric position of the left or 'black point' slider. The right hand input dialog box lets you know the current numeric position of the right hand or 'white point' slider. The middle input levels dialog box lets you know the adjusted gamma or 'midtone' number after moving the middle slider. The output levels sliders allow you to set the black point higher than 0 or set the white point to less than 255. The tonal area between black and white is adjusted automatically to balance with the new white or black point output setting. This tonal 'compression' option is useful when you need to lower the contrast in an image. | ||||
|
||||
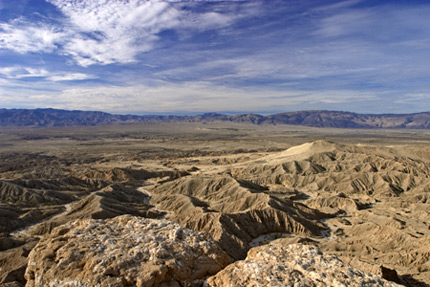
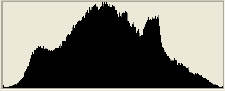
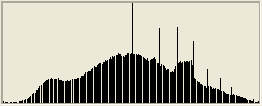
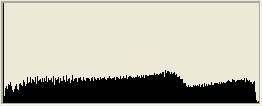
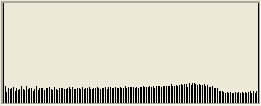
| Lets go back to our desert scene and see if we can improve the tonality by adjusting this image with the levels tool. In the first example below we have the original image and levels tool showing the selected and unadjusted RGB histogram. | ||||
|
||||
|
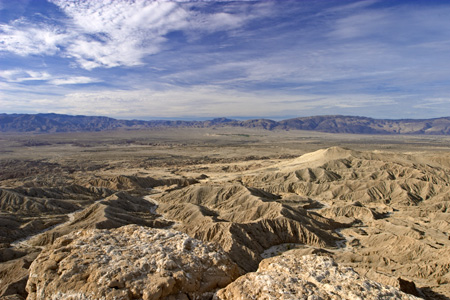
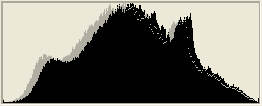
In this next example below we have moved the sliders to set new
white and black points. We moved the black point slider to the
approximate start of the slope of the graph on the left side, 23. This
action remaps the original 23 tonal level pixels down to 0 or black. We set the white point slider to the
approximate start of the slope on the right hand side, 242, which remaps
the original 242 pixels up to 255. Notice that we now
have an expanded histogram and the image has deeper shadows and lighter white clouds. We will now also have a few pixels that are pure black and
pure white. When we review our new histogram, we'll want to make sure
there are only a very few pixels at the 0 and 255 level. The tonal area between the
new
white and black setting is automatically expanded to compensate for the
new white and black points. See the new (after adjustment) RGB histogram
below the levels tool. Notice that we have just a few black and white
pixels climbing up the margins of the new histogram. You can see that the newly adjusted image now has a broader range of tonality with more pixels in the 0 to 23 range and more pixels in the 242 to 255 range. This adjustment automatically adjusted some of the lower midtone pixels to slightly darker numbers and some of the higher midtone pixels to lighter numbers. We have effectively increased the image's contrast. This adjustment has darkened our lower midtones just a little too much for my tastes. |
||||
|
||||
|
||||
|
It is useful to sample the highlight, shadow and midtone areas of your
image with your imaging program's color picker (eyedropper tool).
Knowing where the existing range of tonality is distributed within your
image helps you make decisions on adjusting tonality. Here's another
example scenario. If the brightest area of our midday outdoor photograph is an area of very
dense very white clouds, and they read 175R,165G,165B, we have a red
color cast plus clouds that are close to being light gray instead of white. To
fix this we could add
a little cyan to reduce the red influence. If you use this method you would make small
adjustments and re-read that cloud area with the eyedropper tool until
all three color numbers are as close to being equal as is possible.
After you have removed the color cast set your new white point (dense
white cloud area) to somewhere between 240 and 250 using the white point
slider on the levels tools. Alternately, we could just open the levels
tool, select the white point eyedropper and click on what should be the
lightest and whitest portion of the clouds. This action would remove the
color cast and set a new white point. The new white point would
move the clouds up out of the 175-175-175 gray range into a lighter and
brighter white range of 220-255 on all color channels. Thin midday
clouds may have a little blue influence (slightly higher number in the
blue channel) in their color numbers because of the blue sky 'behind'
them.
I'll give one example of individual color channel adjustment before we leave the histogram adjustment section. Remember our photo of the windfall apples on page 2 of this article. It had a slight warm cast due to late afternoon sun. The blue histogram was well to the left of center indicating its reduced influence on color balance. If we wanted to 'cool off' this image a bit, we could adjust the midtone slider of the BLUE channel histogram to the left to shift the blue pixels that are between 0 and 255 up (to the right) to higher tonal numbers. If necessary, we could also set a new white point on the blue histogram. These adjustments would give more dominance to the blue color channel and reduce the warm color cast. Doing the correction of the warm cast with this method would reduce the warm overall color cast of the image without reducing the red colors of the apples since we did not apply an overall 'cooling' color correction to all of the color channels as would have happened with a 'color balance' adjustment.There are two major advantages to using a 'Levels' tool over using brightness/contrast slider tools for tonal range adjustments. First, you can adjust the dark tones, midtones, and light tones of your image independently. Second, since you are using the image histogram as a guide in the levels tool, you can make sure you do not adjust your highlights too bright (too many pixels between 250-255) or your dark tones and shadows too low (too many pixels between 0-15).This page has outlined a basic levels adjustment approach that will work with just about any image. However, there are some limitations to the effective adjustment of tonality. The only major roadblock is if the original scanned image or out of camera image is way over or under exposed. Digital images are no different from film images in this regard. If there is a high number of pixels in the 255 range, your highlights are blown out. If there is a high number of pixels in the 0 range, you'll have little to no detail at all in your shadow areas. I've provided more example histograms, including over and under exposed image histograms on the next page of this article. WORKING WITH 16 BIT (mode) COLOR I'd like to discuss the importance of doing tonal range and color adjustments, whenever possible, in 16 bit mode. 8 bit mode is also known as 24 bit color since each pixel's color number for each of the three colors of red, green and blue is described by one 8 bit computer 'word' and 3 times 8 = 24. Since a bit is a single entity it can have only two states, on or off. It follows that 8 bits or a 'byte' can represent 2^8th power = 256. We can now see that 8 bit pixels have 256 steps from "color not used" to "all of the color used" for each color channel. Hence, every pixel of a 24 bit color image can have one of 256*256*256 = 16,777,216 different colors.16 bit mode is also called 48 bit color since each pixel's color number for each of the three colors of red, green and blue is described by one 16 bit computer 'word' and 3 times 16 = 48. So, each pixel has 2^16 power or 65,536 steps from "color not used at all" to "all of the color is used" for each color channel. 16 bit mode allows for 256 times more steps for each color channel. Every pixel in a 16 bit color image can therefore have one of 65,536*65,536*65,536 = 281 trillion different colors. (math and theory contributions in paragraph two and three of this section by Dirk Dittert).The amount of colors available in 16 bit mode is way more than the human eye can differentiate between or any printer can produce. However, this increase in color information becomes extremely important when you attempt to expand the existing tonality in your image. Color image tonality is nothing more than the subtle shading of colors. Aggressive color or tonal range adjustments in 8 bit mode will lead to gaps in the tonal range and result in banding in areas that should have smoothly blended transitions from one color to another.
|
||||
|
||||
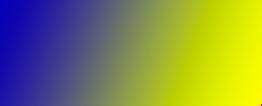
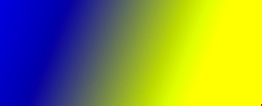
| It would be difficult to see any banding in the tonal gradations in our newly adjusted 8 bit mode desert scene due to the busy nature of the photograph. So, I have made some examples that will allow you to see the visual results of a histogram similar to the one above. For this exercise I made a simple blue to yellow gradient in 8 bit RGB color. | ||||
|
||||
|
||||
For the highest quality image and most flexibility in post processing, scan to 16 bits per color channel R, G and B and adjust image tonality carefully in your scanning application. 'Post processing' refers to any adjustments done to the image after it was scanned or after it was taken in your digital camera. Photograph in RAW mode if you are interested in printing your photographs with maximum 'fine art' quality. If you have a 16 bit color capable image editing program, save your scans and/or digital camera images in 16 bit color. Disk storage is pretty cheap these days. Use your digital camera's thumbnail image and histogram to insure that you have proper exposure. Make your final tweaks to image color and tone curve (levels or curves adjustments) in your RAW converter before you convert the RAW image to JPEG (8 bits per channel color) for web or online use. In the next section we will discuss digital camera histograms and some methods for interpreting your digital camera's thumbnail image and histogram. |
||||
LINKS:
|
||||
|
||||